
Matching is where imported Revit components become an eTool design. Each component that came across is paired with an eTool library template, which supplies everything the model couldn't: the full material breakdown, the installation process, maintenance and replacement cycles, transport, and end-of-life scenarios.
Until the components are matched and confirmed, the import sits in the Import tab as a staged list and your design won't show anything from it yet. That staging is deliberate — it gives you the chance to look over what came across, and decide what belongs in the assessment, before any of it reaches your design.
It's also the usual explanation for a design that still looks empty after a model has been pushed across from Revit.
Open the matching screen
- Open your design and go to the Import tab.
- Select your Revit import and click Edit.
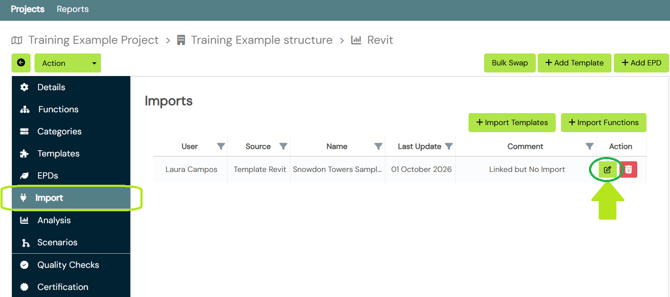
Let the screen finish loading before you touch anything. A small import opens immediately. A large one — several hundred rows — can take a couple of minutes, and it may look frozen while it works. Starting to match before it's finished can cause it to stop responding, and then you're waiting anyway. The row count is shown on screen, so you can tell in advance whether this will be quick or worth stepping away from.
If you'd like to review the whole import before you commit to anything, this is the point to do it — see Review your import in Excel before matching.
What you're looking at
| Column | What it is |
|---|---|
| Category | The Revit category the component came from |
| Item | The component name, as it was named in Revit |
| Area / Volume / Length / Count | The quantities that came across |
| Import Unit | Which of those quantities you want to use — you choose this |
| Template | The eTool template you're matching to |
| Template Unit | The unit of the template you've selected |
Match each row
Open the Template dropdown on a row and you'll see:
- Previously Selected Matches — templates you've matched this exact component name to before. If you imported a component called SLAB_CONC_200mm last time and matched it to a concrete slab, that slab is at the top of the list this time.
- Suggestions — up to ten templates whose names are closest to the component name.
- The full list — every template you can access within your project's LCI Group.
- Search — To refine your template list down using keywords.
- Ignore — to exclude this item from the design entirely.
A note on repeated rows. eTool combines quantities automatically where components share the same category, but anything with a different material or composition name arrives as its own row and needs its own template. On a large model that's why you can end up with hundreds of rows covering a handful of real materials. If that's your situation, it's worth reading Aggregate project data prior to importing into eTool — for very large projects, exporting to a spreadsheet and aggregating before import can be faster than matching row by row here.
Searching for a template. Templates are named for global applicability rather than local terminology, so a regional term often returns nothing while a general one finds it. If "blockwork" comes up empty, try "concrete". Start broad, then narrow.
Matching gets noticeably better with use. Previous matches are checked first, so a component you've matched once is matched for you every time it reappears — which is also why consistent family naming in Revit pays off across projects rather than just within one.
A first-time import needs more attention than your fifth. If you're new, allow time to check the suggestions rather than accepting them — they're a starting point, not a decision.
You have to select an import unit on every row, even when a template is already matched. The default is Ignore, so a row you haven't touched won't come in. This is an extra click, and it's deliberate — it makes you confirm that the quantity you're importing is the right one for the template you chose.
Getting the units right
Every template has its own unit — m², m³, m or count — and your import carries a quantity in each of those columns. When you select a template, the Template Unit column shows which unit it uses, and eTool draws the quantity from the matching column.
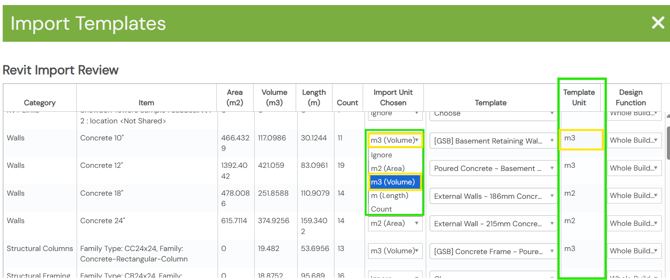
That flexibility is the point: one import can carry areas, volumes, lengths and counts side by side, and each component takes whichever is right for it. It does mean the two need to line up. If you match a row to an m³ template and that row has no volume, the quantity comes through as zero — and the row will still look matched and complete, so it's much easier to resolve here than to track down later.
Two habits keep this straightforward:
- Check the Template Unit against your quantities as you go. If the template is m³ and the volume column is empty, sort it out before moving to the next row.
- Use the Template Unit column rather than the template name. Some names include the unit, many don't. The column always shows it, and updates the moment you select a template.
When a unit doesn't line up, you have two options. Convert the quantity into the template's unit in your source data — applying a thickness to turn an area into a volume, for example. Or clone the template and change its unit: rarely worth it for a one-off, but a good move if your models consistently deliver quantities in a unit your templates don't use.
When nothing is a good match
Most components have a template that fits. When one doesn't, you have three ways forward:
- Ignore it, if the element is already inside another template. Stair nosings are generally part of the stair template, so bringing them in separately would count them twice.
- Match to the closest template and correct the quantity. If you're estimating, note the reasoning in your source data — a documented assumption lets a certification reviewer follow your thinking instead of querying a bare number.
- Clone a template and adjust it. Duplicate the closest template, make your changes, and it's saved to your library alongside the public ones — ready to reuse on the next project. More effort than it's worth for a one-off, but the right move when the same gap keeps appearing. Templates can also be built from other templates, nested inside one another, so a new one rarely has to be assembled from nothing.
You don't have to match everything
Items below the cut-off threshold, modelling artefacts, and elements already contained in another template should be set to Ignore. Matching everything is not more rigorous — it's slower, and double-counting something already inside a template makes the result less accurate, not more.
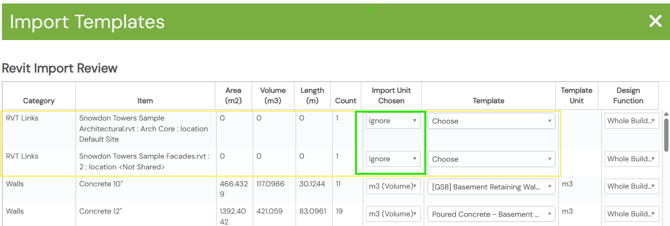
See Review your import in Excel before matching for how to work out what's safe to exclude.
Save with Reviewed
Click Reviewed to save your work. Nothing is saved until you do. If you close the screen without it, your matching is lost.
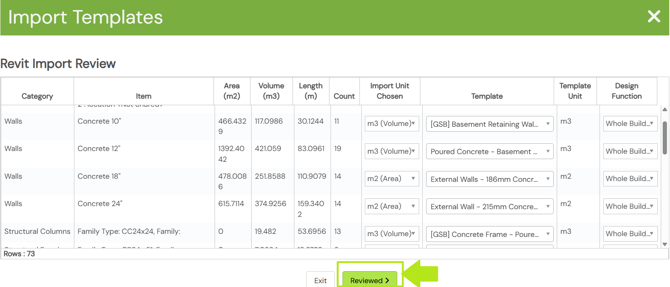
If some rows are still unmatched when you click Reviewed, a Manage unselected matches window appears, telling you how many items haven't been matched and offering to go back or to ignore remaining.
That's your bulk-ignore. On a large import where you only need a subset, match what you need, click Reviewed, then choose ignore remaining rather than setting Ignore on hundreds of rows individually. It isn't obvious that this is where bulk-ignore lives, which is why it's worth knowing before you need it.
Matching a large import across several sessions
You don't have to finish in one sitting.
Match as many rows as you have time for, click Reviewed, and your matched rows are saved. When you come back, open the Import tab and click Edit again — your earlier matches are still there, and you can carry on with the rest. Completed rows aren't duplicated when you go back in.
Updating an existing import
Pushing an updated Revit model refreshes your existing import instead of creating a new one.
Previously matched quantities update automatically, while any new model elements appear as ignore. Once the push is complete, open the import, find the ignore rows, and match the new items you want to keep.
Starting over
To discard everything and begin again, go to the Import tab and delete the import. This removes all its matched templates from the design and leaves the rest of your design untouched.
To change individual items, click Edit and adjust them there instead — you don't need to delete the whole import to fix one row.
Check the scope before you trust the results
The import reflects what was in the model. It can't tell you what was missing from it. Before reading any result:
- Confirm all structural elements came across
- Confirm the architectural elements are there — façades, glazing, roof
- If you imported more than one model, check for duplicates
An implausible result is almost always a scope problem, not a calculation problem.
Related articles
- Review your import in Excel before matching
- Link and send your Revit model to eTool
- Troubleshoot the Revit plugin and import
- Materials take-off: managing differences between design information and eTool templates