
This article explains how model data becomes an eTool design, and which route to take. If you're new to eTool, start here — the articles that follow assume the concepts on this page.
The three methods
- The eTool Revit plugin (automatic) — links a Revit model directly to an eTool design. Push quantities across, match them once, then push again as the design develops.
- CSV bulk import (semi-automatic) — a spreadsheet of quantities from any BIM package, cost plan or bill of quantities, imported into eTool and matched the same way.
- Manual input — entering quantities directly. Best for small projects, early-stage target setting using whole-building templates, or small changes to a design already in eTool.
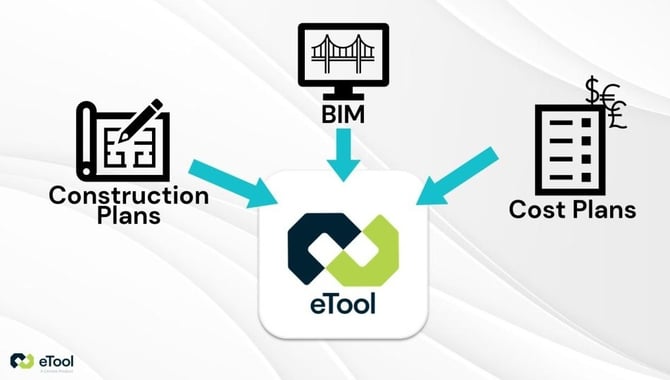
You can combine them, depending on the form your data is in. The first two arrive at the same place: a list of construction components in eTool, each matched to a library template.
| Your source | Route |
|---|---|
| A native Revit file (2017–2027) | Revit plugin |
| ArchiCAD, Rhino, Tekla, IES, or another BIM package | Export to CSV (or XML/gbXML, open in Excel, save as CSV) |
| A bill of quantities or cost plan | Convert to CSV |
| An IFC file | See the warning below — don't convert it to Revit |
| No model yet, or a small project | Build directly from templates in eTool |
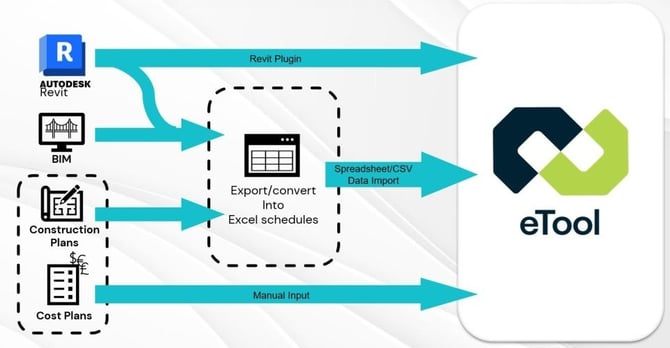
If you have a Revit model, you still have a choice. The plugin is the faster route when you're iterating — it re-syncs as the design changes, so design options and updates cost you very little time after the first match. The plugin is only as good as the model it reads and a large model with a lot of repeated materials can produce hundreds of rows covering a handful of real materials
Where accuracy matters more than speed, sourcing quantities from a cost plan or bill of quantities is generally the more reliable option, because it gives you the chance to scrutinise and aggregate the data before it reaches eTool. On very large projects, exporting a Revit schedule to a spreadsheet and aggregating it before import can also be quicker overall than matching row by row.
Most teams use both, at different points in a project. The plugin during design, when things are changing often and speed matters. A cost-plan import later, when the assessment needs to stand up to review. See Import Feature – Bulk Data Import and Aggregate project data prior to importing into eTool.
A warning about IFC files. An IFC file when converted in Revit will export to eTool with the plugin, however Revit doesn't measure elements from a converted IFC file the way it measures native Revit geometry, so the quantities that come across aren't reliable. Check what file type you actually have before you start, if it's IFC, use the CSV route instead, or ask for the native Revit file.
The end-to-end flow
Whichever route you take, the shape is the same:
- Create the project and design in eTool first. The plugin links to an existing design — it can't create one for you. If your project doesn't appear in the plugin's list, this is almost always why.
- Send the quantities across. Link the Revit model to the design, then update and launch the components.
- Match each component to an eTool template. This is where the real work is, and it's a required step — the import does nothing on its own.
- Review the scope. Confirm the design covers the whole building and nothing has been counted twice.
Why eTool imports components, not materials
This is the part that surprises people coming from other LCA tools, and it changes how you set up your model.
eTool does not pull material quantities out of your BIM model. It pulls construction components — in Revit, that's the Family and Family Type — and you match each one to an eTool template.
If you know Revit, you already know what a template is. An eTool template is close to a Revit family type: a defined element with all its information stored inside it. The difference is what's stored — a family type holds geometry and parameters, while a template holds material quantities, the construction method, maintenance and replacement, and end of life. Templates can be measured in whatever unit suits them: m², m³, linear metres, or a count of something as large as a dwelling.
Take a window. In Revit it's an assembly of aluminium frame, rubber seals and glass. eTool doesn't extract those three material volumes. It extracts the area of the window, and you match that area to a window template in eTool that already contains the full material breakdown, the installation process, maintenance and replacement cycles, and end-of-life scenarios.
The reason is that material quantities pulled straight from a BIM model are consistently incomplete, and the gaps skew results in predictable directions:
- Thin layers are usually missing. Adhesives, paints, finishes, carpet underlay, acoustic insulation. Often documented on the 2D sheets but never modelled as geometry, so there's nothing to extract. Some of them matter a great deal — intumescent paint is the classic example of a small quantity with a large impact.
- Glazing thicknesses are usually wrong. A double-glazed unit that is genuinely 6mm : 20mm : 6mm typically appears in Revit as a single 32mm slab. Applied films are generally absent.
- Reinforcement is rarely modelled. Rebar in concrete is the most common omission of all.
- Assemblies get flattened into solids. Anything built from several parts with voids between them — slabs with cores, decks with profiled sheeting, framed curtain walling — is usually drawn as a simplified solid, because that's what's needed to document and build it. The quantity is right for construction and wrong for assessment.
- Materials don't describe installation. A sum of material quantities tells you nothing about construction-stage impacts.
- Materials don't describe design life. Steel cast into a concrete pile and steel in ductwork have very different replacement cycles. As raw material quantities they're indistinguishable.
The practical consequence: your model needs to be complete enough to identify components, not complete enough to be a full material take-off. That's a much lower bar, and it's why you can start an LCA from an early concept model.
Why this matters early. The opportunity to reduce embodied carbon shrinks as a design firms up — by the time a contractor is building, most of the decisions that mattered have been made. An assessment run at concept stage, on an imperfect model, is worth considerably more than a precise one run at the end.
Component matching is what makes the early one possible, and it's why the same project can be assessed at every stage:
- Brief and target setting — generic templates can produce a benchmark or a target in minutes, before there are drawings or a model at all.
- Detailed design — start from that benchmark and improve it as the design develops.
- Product specification — swap generic templates for EPDs once real products are chosen.
- As built — assess in full detail, and show the client and design team what was actually saved along the way.
It also keeps comparisons fair. Whether template precision shifts a whole-building result is often marginal — but when you're comparing two window options against each other, both need to be modelled consistently or the comparison tells you nothing.
Two very different situations
Most users fall into one of two camps, and the advice diverges:
You receive Revit files from someone else. Typical for consultants working from an architect's or engineer's model. You have little or no control over how the model was built or how elements were named, and you have to work with what arrives. Most of your preparation happens after the import, in eTool or in Excel.
Your organisation has its own BIM team. Typical for large enterprises. You have a two-way conversation available: you can ask the BIM team to name and structure things in a way that imports cleanly, or adapt your eTool setup to match how they already work. That conversation is worth having early, because the benefit applies to every project that follows.
If naming can't be changed because the model is tied to other systems, eTool templates have a unique-identifier field that lets you match on a stable code rather than on a name.
Frequently asked
Does eTool integrate with ArchiCAD? Not with a dedicated plugin. Export project information from ArchiCAD to CSV and use the import route — the matching workflow in eTool follows the CSV bulk import route. See Import Feature – Bulk Data Import
Can I import design options? Yes. Push your first option, match it, then push the next option to the same linked design. eTool applies removals and quantity changes automatically, so only genuinely new components need matching. See Link and send your Revit model.
I want to practise before I use a real client model. Sensible. Sample Revit files are available to download from Autodesk and other sources — a small residential model is enough to walk the whole workflow end to end without any pressure.
The Revit pathway
- How eTool works with BIM models (you are here)
- Install the eTool Revit plugin
- Prepare your Revit model before importing
- Link and send your Revit model to eTool
- Review your import in Excel before matching (recommended)
- Match imported components to eTool templates
- Troubleshoot the Revit plugin and import
- eTool Revit plugin version history